
We all know that light is the crucial element in photography. Understanding how it behaves and the factors that influence it is mandatory.
For sunlight, we can distinguish the following light phases depending on the elevation of the sun: golden hour, blue hour, twilights, daytime and nighttime.
Sunrise and sunset are a little more complex than just “day to night” or vice versa, at least for photographers, because there are different types of light and the illumination of the sky doesn’t just simply go from daylight to the black of night.
It is import to know that sunlight has seven colors (the rainbow is proof of this): red, orange, yellow, green, blue, indigo and violet. The further light travels trough the atmosphere, the more spread out the blue lights are. Because the blue lights are spread out, the red lights are more visible. It is also necessary to understand that the night is only black because of the lack of light. It is actually deep blue.
You might be familiar with the “Golden Hour” (that magical time that everyone with a camera knows about) and “Blue Hour” (the not as well known cousin that people get less excited about). But I do you know about Civil, Nautical, and Astronomical Twilight? 3 twilights?! Yes, 3! Well, maybe 3 distinct parts that together make up the whole.
The following list shows the different light phases depending on the elevation of the sun… Please don’t panic, you can use PhotoPills to comfortably find out when each light phase occurs:
- Nighttime (below -18°)
- Morning twilights (from -18° to 0°)
- Astronomical Twilight (from -18° to -12°)
- Nautical Twilight (from -12° to -6°)
- Civil twilight (from -6° to 0°)
- Morning magic hours
- Blue hour (from -6° to -4°)
- Golden hour (from -4° to 6°)
- Daytime (above 6°)
- Evening magic hours
- Golden hour (from 6° to -4°)
- Blue hour (from -4° to -6°)
- Evening twilights (from 0° to -18°)
- Civil twilight (from 0° to -6°)
- Nautical Twilight (from -6° to -12°)
- Astronomical Twilight (from -12° to -18°)
- Nighttime (below -18°)
So what are the characteristics and differences of each of these times? Well, let’s take a look…
Firstly, it is important to mention that the term “hour” is used quite loosely, the amount of time for each period can be significantly less and most photographers wish that blue hour, for example, would last a little longer!
Twilight
Twilight is the transition between day and night (and vice versa) and happens in multiple phases. It starts deep in the night, the sky is black. A few hours before sunrise, the sky slowly starts to get a bit brighter. Pitch black darkness turns into deep blue. At this point, the sun is still far away from the horizon (at another part of our planet), but it is getting closer. Just enough light travels trough the atmosphere to light up the sky a bit. This is called astronomical twilight. A little moment later, the sun is getting closer to the horizon, the sky turns blue and is bright enough to see the shapes of the world around you. This phase is the nautical twilight.
Moments later, as the sun is getting even closer to the horizon, the light still has to travel a far distance but is bright enough the wake up the world. It is the civil twilight. The sun is just starting to peak around the bulging edge of the planet to reach that part of the earth where the day is about to start. Like mentioned, when light has to travel far, the blue lights spread out and the red lights are more visible. As a result, with the right conditions, just when the sunrise starts, the sky is turning red. The best change for a red sunrise is when there is approximately 70 percent overcast. Too many clouds block out the sunlight, too little clouds and the light has no objects to reflect on.
After the civil twilight, the sun rises over the horizon, and as it gets higher in the sky, the blue and red colors are mingled again, combining for white bright daylight.
The phases described are shown in the image below during a sunset.
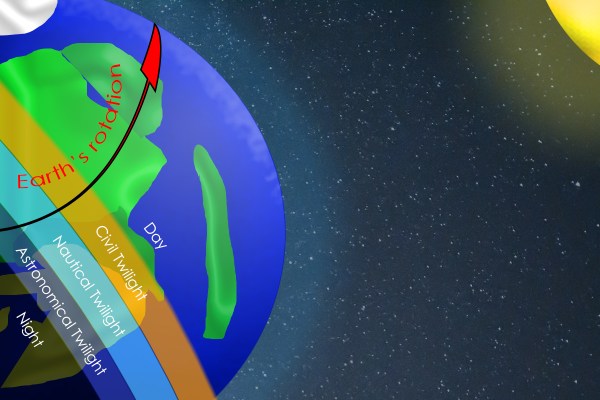
During sunrise, night turns to day in the phases astronomical twilight, nautical twilight, and finished by civil twilight. The sunset is during the civil twilight. However, when day turns to night, these phases take place in reverse order: day becomes the civil twilight at sunset and turns into nautical twilight, and after the astronomical twilight day becomes night.


Golden Hour
The golden hour, which is sometimes known as magic hour, is the first and last hour of sunlight during the day when a specific photographic effect is achieved due to the quality of the light. Because the contrast is heavily reduced during this time the shadows are less dark and the highlights are less likely to be overexposed, plus the warm color of the low sun is often considered desirable to enhance the colors of the scene, adding vibrancy to your images.
Why is this moment called the “golden hour”?
As explained above, during civil twilight, light has to travel a far distance. Because light has to travel far, the blue lights are spread out and there is more room for red light. This gives the light a golden glow and the moment roughly lasts one hour! Of course, during the winter, the sun is much lower at the horizon than in the summer, hence the golden hour lasts a little longer.
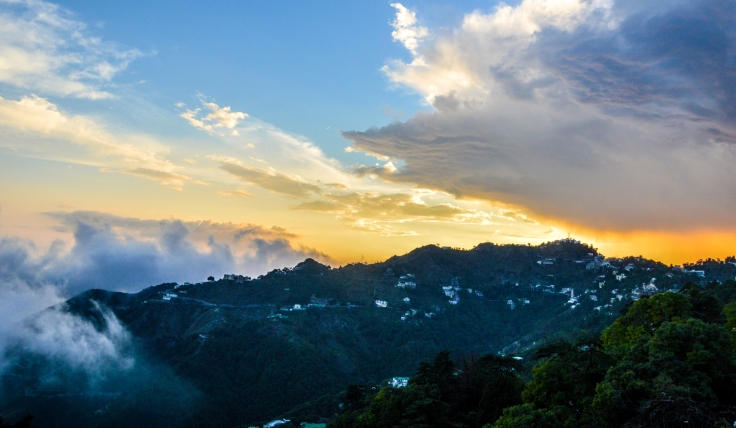
Golden hour is a great time to shoot because the sun is low and creates a nice, warm light (golden) without the hard shadows that you see in the middle of the day. Really each day has two Golden Hours. One at sunrise and one at sunset, they don’t only happen with the sun above the horizon, and they aren’t strictly an hour. Sometimes they are more than an hour, and sometimes they are less. During the golden hour, most light is indirect, and therefore less intense. Less intense light means less harsh shadows, and this means softer pictures!
What Kind of Photography is it Good For?
- Landscapes
- Cityscapes
- Portraits
- Macro
- Still life
Pretty much everything seems to look better when subjected to the warmth of the golden hour. And you’re not limited to working exclusively outdoors. You can get some beautiful natural indoor lighting by letting in some of that magic through a large window.
Quick Tips for Shooting During the Golden Hour
- Shoot Fast. Don’t be in so much of a rush that you fail to use good technique, but remember that you’ve got a relatively small window in which to take advantage of this gorgeous light.
- Calculate Your Golden Hour. You can help maximize your golden hour efficiency by planning ahead. Know your destination, have an idea of what subjects you want to shoot, and calculate precisely when the golden hour occurs where you live. This handy golden hour calculator will do all the math for you.
- Use a Wide Aperture. If you don’t typically shoot wide open, the golden hour presents a great opportunity to do so. You will be awed by the beautiful “points-of-light” bokeh created during these times of the day.
- Stay With It. Changes in lighting during the golden hour occur pretty fast; the landscape you shot when first arriving at your location will probably look significantly different 10 minutes later. So keep shooting for the whole hour and be sure to capture as many variations as possible.
- Adjust White Balance. Auto white balance isn’t your best choice when shooting during the golden hour. Set your white balance to “cloudy,” otherwise you risk neutralizing the wonderful golden glow.

Shooting during the golden hour can be inconvenient; you may have to sacrifice your cozy bed to shoot early or unglue yourself from your regular spot on the sofa to shoot in the evening. But you will be dearly rewarded, as the impact of shooting at these magical times of day can be truly transformative. Get out there and try it for yourself. Prepare to be amazed.
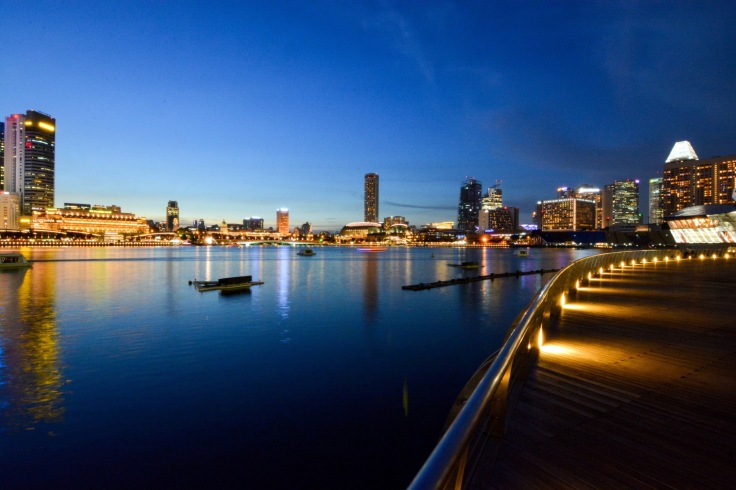
Blue Hour
The term blue hour comes from the French expression l’heure bleue, which refers to the period of twilight each morning and evening where there is neither full daylight nor complete darkness. Blue hour generally starts about 30-40 minutes after sunset; bear in mind that this will vary depending on where you are and also the time of year. The quality of light is an absolute gift for photographers and you can really use that quality of light to produce special colors in your images, it is also worth noting that many photographers find the best subjects for blue hour shots are well-lit buildings or structures.
Instead of golden tones across the landscape, there is a cooler color across everything giving a bluish, nighttime feel. The sky is transitioning from night to day or day to night and there is a nice gradient from blue to orange. City lights are will be on but the last light from the sun will still allow things to be visible without any outside help. Shooting photos during this time will give some cool silhouettes for anything on the horizon, and can lightly illuminate a scene depending on the length of your shot.
Blue “hour” is an even shorter time than the golden hour. Shorter because blue hour describes the sun from 4°-6° below the horizon. The sun travels a shorter distance during this time, so it naturally takes up less time.
What Kind of Photography is it Good For?
- Cityscapes
- Busy winding roads
- Beaches
- Wharfs
- Bridges
- A fair or circus
- Marinas
Planning Your Blue Hour Shoot
Much like the golden hour, the blue hour is a small window of opportunity – perhaps even shorter. BlueHourSite shows the time when the blue hour starts at any given location.
Another smart idea would be to scout your location before the blue hour starts, paying attention to compositions and perspectives. Since the blue hour is a very short time, anything you can do beforehand to make your shoot go smoother would be ideal.
Quick Tips for Shooting During the Blue Hour
- Shoot in Shutter Priority mode. During the blue hour, the sky will be relatively dark because the sun is below the horizon. You’ll need a long/slow shutter speed to let in enough light for properly exposed photos.nPutting your camera in Shutter Priority mode allows you to manually choose your shutter speed. A shutter speed of one to six seconds should get good results.
- Use a remote or self-timed shutter release. Pressing the shutter release button can cause camera shake, which will create blurry photos. To avoid this, use your remote or set the camera’s self-timer to two seconds.
- Use a tripod. As mentioned above, you’ll be using a slow shutter speed, so a tripod will help you capture a sharp image. If you hand hold your camera during a slow shutter speed, your photos will be blurry because of camera shake.
- Shoot in RAW. It’s best to capture RAW files when shooting the blue hour. This will give you the highest quality capture, and the best advantages when editing. One nice advantage of shooting in RAW is that you can adjust the exposure compensation in editing. This way, if your photos came out a little too dark or light, you can adjust them up or down accordingly. But if you have a point and shoot that only captures JPEGs, don’t worry – you can still get great blue hour shots.


Do not confuse the photo above with a technical sunrise/ sunset photo. This photo was taken by travel photographer Kavya Rastogi from an overnight flight to Kuala Lumpur. This is how the sky looks from above just before a sunrise.
I would suggest to learn about these phases yourself keeping in mind the details above. Get out in the early morning and evening to shoot even more and you will begin to learn about the different parts of the transition.
Share your favorite time of the day to shoot in the comments below. You can also share your blue hour, golden hour and twilight photos with us. We would love to see.

February 4, 2017 at 9:12 pm
Great and helpful article. Could I offer one correction: you state the order of the visible spectrum of light as going from red, orange, yellow, through to blue violet and indigo. the last two should be reversed, indigo is a very dark blue and shades into violet, a very dark blue magenta, otherwise I enjoyed the read a lot.
LikeLike
February 4, 2017 at 9:23 pm
Thanks!! Appreciate it
LikeLike